A brief introduction to ‘make’, a workflow engine
Learning objectives: get a first look at a Makefile, and put your code and new Makefile into a git repository on GitHub.
‘make’ is a way to set up a computational pipeline, or workflow, in such a way that you can execute it all with a single command. (There are other programs than ‘make’, including snakemake, pydoit, scons, and makeflow; they all do fairly similar things.) We’re using ‘make’ because it’s simple, it’s ubiquitous, and it illustrates the basic points.
We’re going to walk through the first two parts of the Software Carpentry ‘make’ tutorial. To get started, we’ll have to:
- download some data;
- configure matplotlib to work without interactive graphics;
- fix our editor to put tabs in Makefiles;
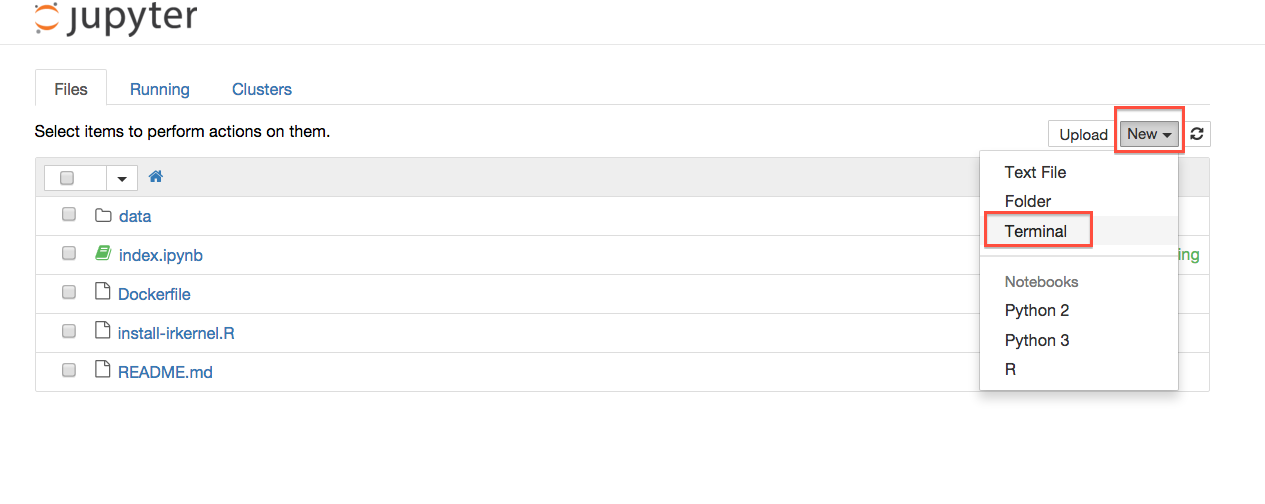
Create a new terminal by going to the Console (File... Open...) and then doing New... Terminal. See the screenshot below –
Once you have a new terminal, copy and paste the following:
wget https://swcarpentry.github.io/make-novice/make-lesson.zip
unzip make-lesson.zip
cd ./make-lesson/
This downloads a bunch of scripts from the ‘make’ lesson, and changes to that directory.
You will also need to configure matplotlib to display to a file - see this stackoverflow issue:
echo backend : Agg >> matplotlibrc
Note
A tip on organizing your windows: we’re going to be doing a lot of copy-pasting, and you can arrange your tabs and windows to faciliate this! Put your terminal window in a new window, and then you can use Alt-TAB (on Windows) or Command-backquote (on Mac) to switch quickly between the windows.
One last step in configuration – to edit Makefiles with tabs in the Jupyter editor, you’ll need to do this:
mkdir -p ~/.jupyter/nbconfig
echo '{ "Editor": { "codemirror_options": { "indentWithTabs": true } } }' >\
   ~/.jupyter/nbconfig/edit.json
(See my issue in Jupyter’s issue tracker for this and other resolutions.)
Building a Makefile
Now, let’s walk through the first two bits of the make lesson:
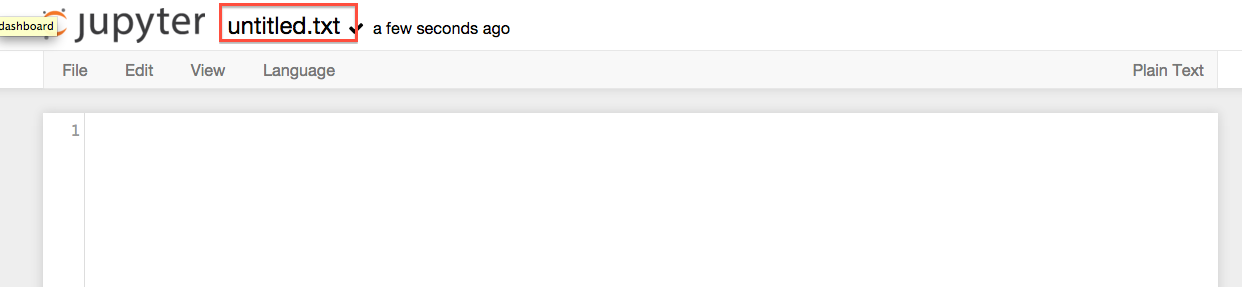
When the time comes to edit files, you can do so in the Jupyter console by entering the make-lesson folder, creating a New... Text file, and then renaming it to the desired filename. (See screenshots below.)

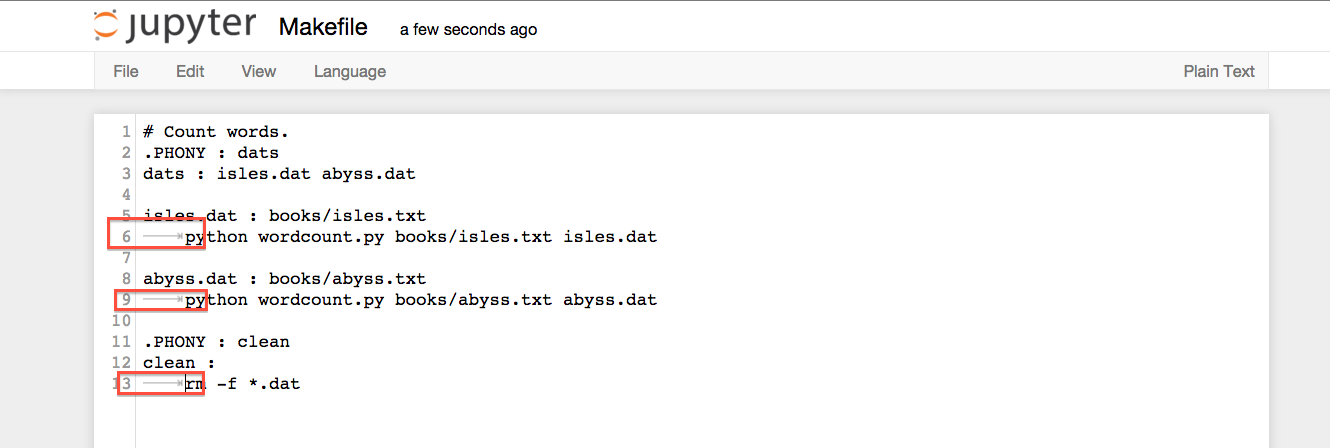
In your Makefile, you’ll need to be sure to put in tabs instead of spaces for indents; your final Makefile should look like this:
Saving everything to GitHub
At this point, you should be able to type ‘make’ to build everything, and ‘make clean’ to remove all the outputs and start over from scratch. Now we want to save this to github so that we can communicate it to ourselves (and others!)
First, we’ll make a git repository.
Making a local git repo
Configure git, replacing the e-mail and name with your own:
git config --global user.email some@user.com
git config --global user.name "Some User"
Now, create a new local git repository, and add all your input files and scripts:
git init
git add Makefile matplotlibrc plotcount.py wordcount.py books
git commit -m "initial commit"
(Note, here adding the ‘books’ data into git for convenience, but in general we don’t recommend putting raw data into your github repo.)
Now, we want to push this to a public repository on github.
Pushing from a local repository to github
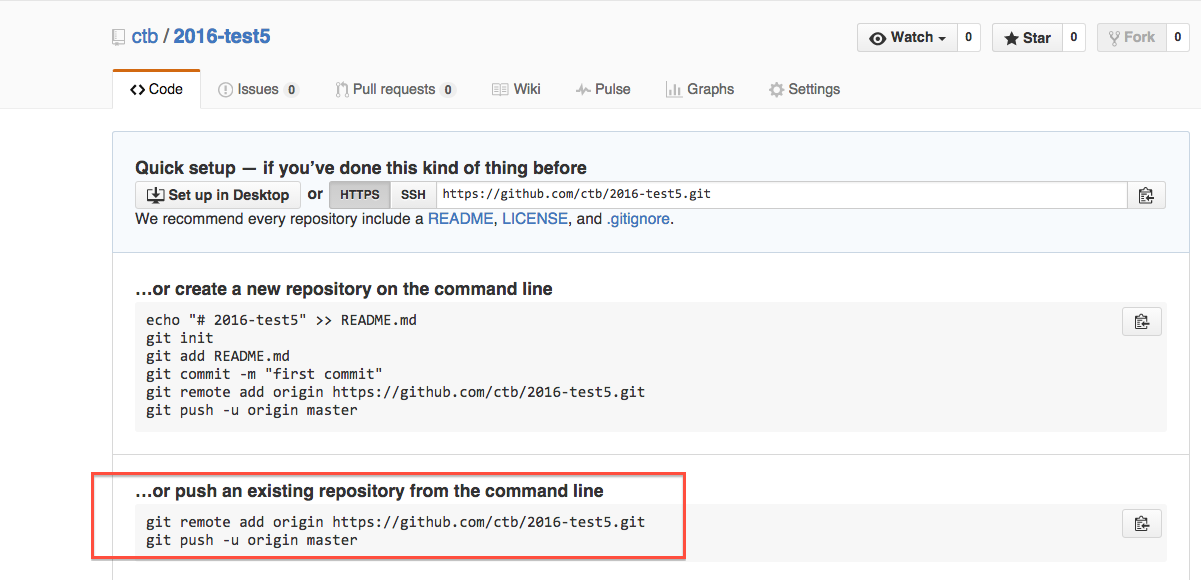
Finally, go to github.com and create a new repository, and then copy and paste the commands under ”...or push an existing repository from the command line.” (See screenshot, below.)
You should now have a new repository, full of your data, scripts, and now a Makefile. Congrats!
Next: Putting it all together: make, git, and a Jupyter notebook
LICENSE: This documentation and all textual/graphic site content is licensed under the Creative Commons - 0 License (CC0) -- fork @ github. Presentations (PPT/PDF) and PDFs are the property of their respective owners and are under the terms indicated within the presentation.